Table of Contents
- What is CSS & Java Script?
- How can I view the information (HTML codes & scripts) about my website?
- What can be changed with Javascript and CSS?
- Moves teaser text in the header to the right if no form is used in the header:
- Adjust the alignment of the heading
- Line break in the headings
- Changes the text after you have already agreed
- Changes the darkening of the header image (RGB value plus transparency):
- Changes the font on the website
- Changes the colour of the selected button in the registration form
- Changes the transparency of the button and the duration between color and transparency of the button after selection
- Changes the colors of the registration form
- Changes the header text and the layout of the registration form on the website
- Changes the brightness/transparency of the header background
- Changes the font (size, thickness and line spacing) within the registration form
- Changes the font thickness of the labels of the Acceptance and Cancellation Button
- Changes the font colour (field labels) within the registration form.
- Changes the background colour of the complete registration form
- Removes the white hyphen between headline and text in the header
- Changes the spacing of the logo (partners/sponsors) on the website
- Change the order (line break) of the speakers. (Default setting: 3 speakers per row)
- Changes the font size of the title in the header
- Changes the font size and colour of the title in the header
- Changes the orientation of an intermediate text in the registration document
- Changes the size of the sponsor logos (line breaks are more likely to occur)
- Removes the social media button in the countdown area
- Changes the colour of the counter (countdown)
- Changes the size of the countdown text (first line)
- Changes the colours in the programme items area
- Hide individual programme items (only the white area)
- Changes the colours in the location module
- Changes the orientation and distance of a possible radio button in the registration form
- Changes the color of the "hyper links" in the registration form
- Hide registration form completely (also applies to stand-alone form module)
- Hide registration form completely (also applies to stand-alone form module)
- Change the time of the countdown in the Virtual Event Platform to German abbreviations.
- Virtual Event Platform: Use "Live Badge" for Menu Buttons
- Virtual Event Platform: activate/deactivate modules independent of event start time
- Virtual Event Platform: Arrangement of speakers in customize
- The use of a hyperlink outside the text editor (e-mails and web pages)
CSS & Java Scripts for website customisation
 Updated
by Ingo
Updated
by Ingo
- What is CSS & Java Script?
- How can I view the information (HTML codes & scripts) about my website?
- What can be changed with Javascript and CSS?
- Moves teaser text in the header to the right if no form is used in the header:
- Adjust the alignment of the heading
- Line break in the headings
- Changes the text after you have already agreed
- Changes the darkening of the header image (RGB value plus transparency):
- Changes the font on the website
- Changes the colour of the selected button in the registration form
- Changes the transparency of the button and the duration between color and transparency of the button after selection
- Changes the colors of the registration form
- Changes the header text and the layout of the registration form on the website
- Changes the brightness/transparency of the header background
- Changes the font (size, thickness and line spacing) within the registration form
- Changes the font thickness of the labels of the Acceptance and Cancellation Button
- Changes the font colour (field labels) within the registration form.
- Changes the background colour of the complete registration form
- Removes the white hyphen between headline and text in the header
- Changes the spacing of the logo (partners/sponsors) on the website
- Change the order (line break) of the speakers. (Default setting: 3 speakers per row)
- Changes the font size of the title in the header
- Changes the font size and colour of the title in the header
- Changes the orientation of an intermediate text in the registration document
- Changes the size of the sponsor logos (line breaks are more likely to occur)
- Removes the social media button in the countdown area
- Changes the colour of the counter (countdown)
- Changes the size of the countdown text (first line)
- Changes the colours in the programme items area
- Hide individual programme items (only the white area)
- Changes the colours in the location module
- Changes the orientation and distance of a possible radio button in the registration form
- Changes the color of the "hyper links" in the registration form
- Hide registration form completely (also applies to stand-alone form module)
- Hide registration form completely (also applies to stand-alone form module)
- Change the time of the countdown in the Virtual Event Platform to German abbreviations.
- Virtual Event Platform: Use "Live Badge" for Menu Buttons
- Virtual Event Platform: activate/deactivate modules independent of event start time
- Virtual Event Platform: Arrangement of speakers in customize
- The use of a hyperlink outside the text editor (e-mails and web pages)
This module is an optional offer. Sweap enables you to create attractive websites quickly and easily without any programming knowledge, using straightforward steps. However, should you wish to create your own CSS or JavaScript for the website, you can do so here.

What is CSS & Java Script?
"With Cascading Style Sheets (CSS) you can define the appearance of text and HTML elements".
Further information on the use of CSS can be found here:: CSS/Tutorials/Einstieg
"JavaScript (short JS) is a scripting language originally developed by Netscape in 1995 for dynamic HTML in web browsers to evaluate user interactions, modify, reload or generate content and thus extend the possibilities of HTML and CSS". (Source: https://de.wikipedia.org/wiki/JavaScript)
Further information on the use of Java Script can be found here: JavaScript/Tutorials/Einstieg
How can I view the information (HTML codes & scripts) about my website?
- Open web page and click right mouse button.
- In the info window, click on "Examine" (applies to Google Chrome & may be named differently depending on the browser)
- The "console drawer" opens on the right side.
- Activate the function "Select an element in the page to inspect it" at the top left.
- Move the mouse cursor to the desired position where the information is required (here: form field Company).
What can be changed with Javascript and CSS?
Below are a few examples that you can use directly for the Sweap registration page (website)
Moves teaser text in the header to the right if no form is used in the header:
@media (min-width: 992px) {
  .promo .col-md-6:only-child {
    margin-left: 50%;
  }
}
Adjust the alignment of the heading
By default, module headings are centered on the web page. By CSS you can display them left or right aligned.
.registration .section-heading h1 { text-align: left; }registration .section-heading h1 = Definition of the area. Here heading in the registration form area
left = left-justified
right = right-justified
Line break in the headings
<br />
Example: Heading: The text is too long for one line / Wrap should be done after the word long.
The text is too long for me <br /> for one line.
Changes the text after you have already agreed
$('#registration_warning_already_accepted').text('Please enter the text here');Changes the darkening of the header image (RGB value plus transparency):
The background of the header text of a website can be changed by checking the appropriate box. This allows you to select a specific colour (RGB) for darkening and to specify the transparency (RGBA value).
f.e. color #003882 as RGB 0, 56, 130 with transparency 0.2
Link to the "Hex to RGB converter"
.promo .color-correction {
  background-color: rgba(0, 56, 130, 0.2);
}
Changes the font on the website
If the standard font is to be replaced by your own (e.g. belonging to the corporate design) font.
font xy = define own font
body, .map .popover {
 font-family: 'font xy', Lato, Helvetica, Arial, sans-serif;
}
Changes the colour of the selected button in the registration form
backround-color = Button color
border-color = Colour of the border of the button
color = Font color in button
#form_button_1 {
    background-color: #5f2d87;
    border-color: #5f2d87;
    color: #ffffff;
}
Changes the transparency of the button and the duration between color and transparency of the button after selection
background-color 0.15 = the higher the value, the less transparent the button
transition 0.5s = the higher the value the longer the switching time between color and transparency after selection
color = button color
#form_button_1:hover, #form_button_1:active {
    background-color: rgba(0,0,0,0.15);
    -webkit-transition: all 0.5s ease;
    -o-transition: all 0.5s ease;
    transition: all 0.5s ease;
    color: #5f2d87;
}
Changes the colors of the registration form
Background color
.promo .register {
    background-color: rgba(206, 217, 231, 0.8);
}
Font color
.promo .register {
    color: rgba(0, 51, 102);
}
Text fields in the registration form
background 0.4 = Transparency of the text field
border-color = Color border of the text field
color = Color of the text in the text field
.promo .register .form-control {
    background: rgba(0, 0, 0, 0.4);
    border-color: #003366;
    color: #003366;
}
Dropdown text fields in the registration form
(commands see text fields)
.dropdown-toggle {
    background: rgba(0, 0, 0, 0);
    border-color: #003366;
    color: #003366;
}
Changes the header text and the layout of the registration form on the website
min-width: 992px = Change size pixel (px), changes the size of the header text
promo .col-md-6 = Change of number, changes the arrangement (left, centre...) of the registration document
width: 100% = Changing the size of the registration document
@media (min-width: 992px) {
 .promo .col-md-6 {
   width: 100%;
 }
}
Changes the brightness/transparency of the header background
background-color 0.4 = the higher the value, the darker the background
.promo .color-correction {
background-color: rgba(0, 0, 0, 0.4)
}
Changes the font (size, thickness and line spacing) within the registration form
.register-form label, .register-form p, .register-form .btn-empty {
    font-size: 16px;
    font-weight: 300;
    line-height: 1.4;
}
Changes the font thickness of the labels of the Acceptance and Cancellation Button
Acceptance-Button
.btn-custom-accept {
   font-weight: bold;
}
Cancellation-Button
.btn-custom-decline {
   font-weight: bold;
}
Changes the font colour (field labels) within the registration form.
.register-form form label.control-label {
    color: #ff0000;
}
Changes the background colour of the complete registration form
.promo .register {background-color: #ff0000}Removes the white hyphen between headline and text in the header
.promo .promo-text hr {display: none}Changes the spacing of the logo (partners/sponsors) on the website
.partners .list-inline li {
    margin-left: 10px;
    margin-right: 10px;
}
Change the order (line break) of the speakers. (Default setting: 3 speakers per row)
@media (min-width: 992px) {
    .speakers-wrapper .speaker {
        width: 50%;
    }
}
width: 50% = 2 Speakers per row
width: 25% = 4 Speakers per row
Changes the font size of the title in the header
percentage font size
.promo .promo-text h1 {
    font-size:220%
}
font-size in pxl
.promo .promo-text h1 {
    font-size:31px
}
#home > div.container > div > div.col-md-6 > div > h1 {
font-size: 28px;
}Changes the font size and colour of the title in the header
.promo .promo-text h1 {
    font-weight: semi-bold
}
.promo .promo-text h1 {
color: #49002c
}border-top-color = Colour of the dividing line under the header heading
.promo .promo-text hr {
    border-top-color: #49002c;
}
Changes the orientation of an intermediate text in the registration document
#register_form_group_11_0 {
    text-align: center;
    margin-bottom: 0px;
}
Changes the size of the sponsor logos (line breaks are more likely to occur)
width: 25% = the smaller the value, the smaller the logo
.partners .list-inline li {
    width: 25%;
}
Removes the social media button in the countdown area
.counter-text .list-inline.join-us {
   display: none;
}
Changes the colour of the counter (countdown)
.counter {
   color: #ffffff;
}
Changes the size of the countdown text (first line)
#about > div > div > div.col-md-4.text-center > h1 {
    font-size: 28px;
}
Changes the colours in the programme items area
Background colour of the programme items
.schedule .panel-default .panel-heading {
    background-color: #003366;
}
Colour change of the border of the programme items
.schedule .panel-default {
    border-color: #efefef;
}
Hide individual programme items (only the white area)
collapse1 = the number must be assigned to the area
#collapse1 .panel-body {
    display: none;
}
Changes the colours in the location module
Colour change of the pins (symbols)
.map .popover .fa {
    color: #003882;
}
Colour change of the text (next to the pins)
.map .popover a {
    color: #003882;
}
Changes the orientation and distance of a possible radio button in the registration form
The HTML ID (marked bold) must be replaced according to the desired radio button.
20px = distance to reference point
#form_anrede .radio {
    display: inline;
    padding-right: 20px;
}
Changes the color of the "hyper links" in the registration form
As a rule, the hyperlinks (e.g. data protection, general terms and conditions etc.) are displayed in blue. With this command you can adjust the font color/link color.
#register_form p a {
color: #ffffff;
}
Hide registration form completely (also applies to stand-alone form module)
.register-form {
    display: none;
}
Hide registration form completely (also applies to stand-alone form module)
.register-form .btn-custom-accept {
    display: none;
}
Change the time of the countdown in the Virtual Event Platform to German abbreviations.

ATTENTION! Please use the CustomJavascript section for this.
mate_progressBarConfig.i18n.daysShort = " Tag(e)";
mate_progressBarConfig.i18n.hoursShort = " Stunde(n)";
mate_progressBarConfig.i18n.minutesShort = " Minute(n)";
mate_progressBarConfig.i18n.secondsShort = " Sekunde(n)";
Virtual Event Platform: Use "Live Badge" for Menu Buttons
In order to make clear to the participants that, for example, the stream is now live, this can be made clear with this function.
The Javascript can be used to define for which area (button) and at what time this badge should be activated.
MATEMenuUtil.addLiveBadge('home', '2021-03-04T17:20:00+0100', '2022-01-04T22:00:00+0100')The date and time are generated in ISO8601 format with the time zone ( +0100) at the end.
The following applies here:
- GMT+1 = +0100 = Central European Time
- GMT+2 = +0200 = Central European Summer Time
You can generate the times for example with the following tool: https://timestampgenerator.com
In order to define the button/area where the badge should be displayed, the word home must be replaced by the desired one.
The names for the modules are as follows:
- home
- schedule
- mate-livestream
- mate-videoplayer
- mate-contentflow
- mate-elie
- mate-workshop
- mate-teams
- mate-fanomena
- mate-saysom
- mate-wonderme
- mate-mosaik
Virtual Event Platform: activate/deactivate modules independent of event start time
It is also possible via JavaScript to activate individual modules independently of the start time of the event or to deactivate them before the end of the event.
In general, the following applies:
As soon as an "addEnabled" value is set for a module, it is automatically disabled at all "not enabled" times. If there is NO "addEnabled" value for a module, it is automatically always clickable.
MATEMenuUtil.addEnabled('home', '2021-03-16T13:58:00+0100', '2022-01-04T22:00:00+0100')Date and time and module ranges are generated and applied as in the LiveBadge function.
Virtual Event Platform: Arrangement of speakers in customize
With the help of this code, an automatic line break is applied after the fourth speaker.
The following command must be inserted in the Custom CSS & Javascript --> Custom CSS area.
.mate-speaker-parent-wrapper {
    display: flex;
    justify-content: center;
}

.mate-speaker-parent {
    max-width: 900px;
}
The use of a hyperlink outside the text editor (e-mails and web pages)
Using the HTML command, a hyperlink can also be placed in text areas that do not contain a text editor function.
Example: The description of a checkbox query in the registration form should contain a link.
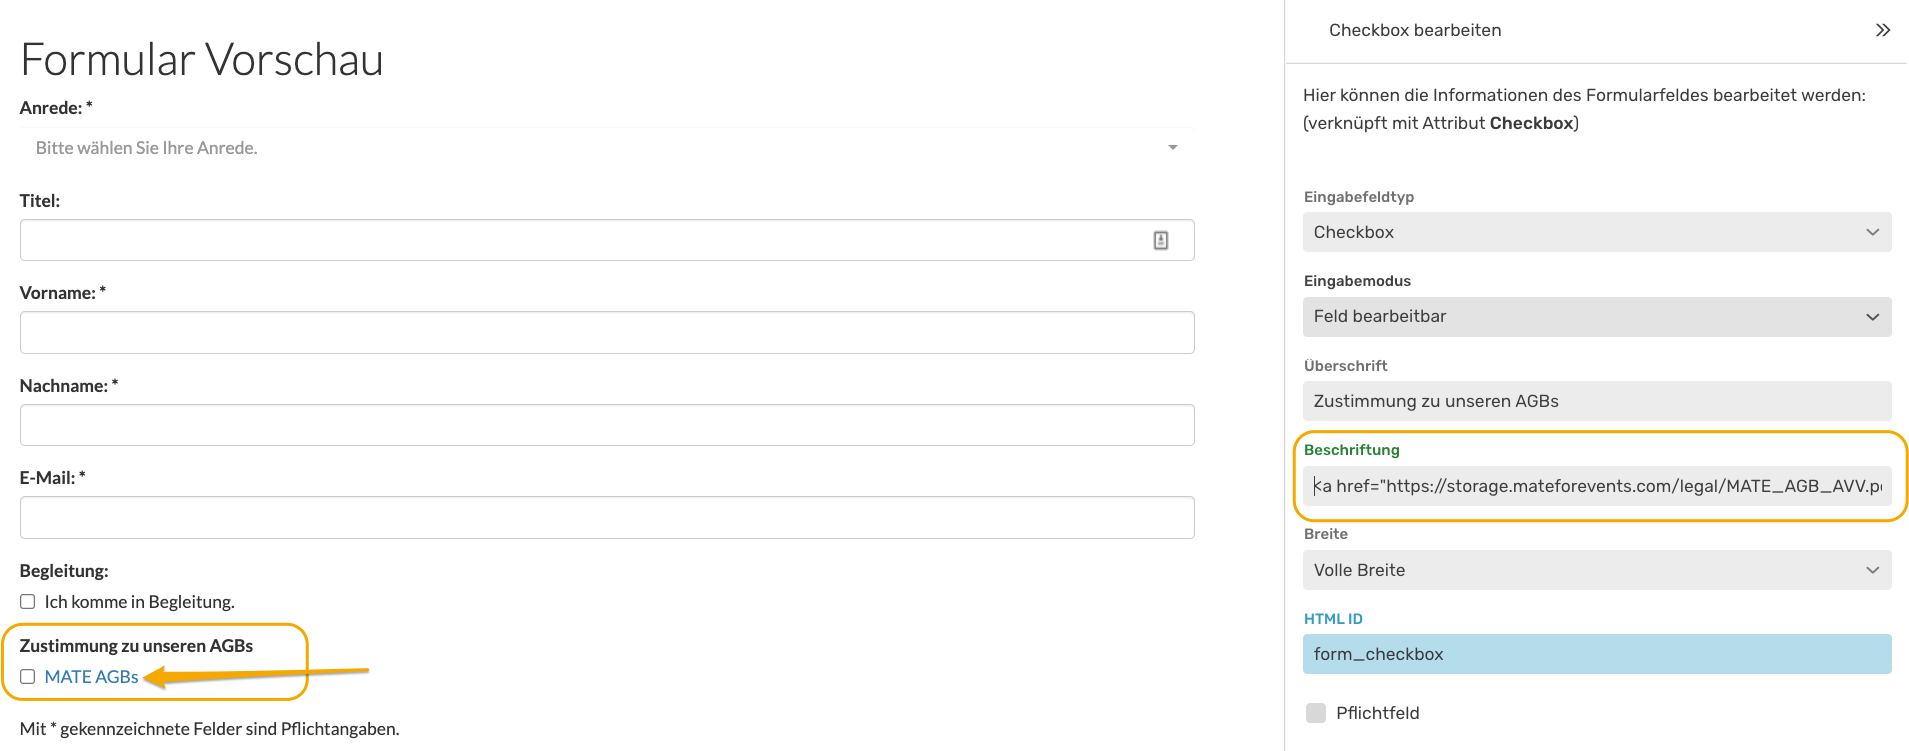
The following code is required for this:
<a href="Link">Link-Text</a>
For our example: <a href="https://storage.mateforevents.com/legal/MATE_AGB_AVV.pdf">MATE AGBs</a>