Table of Contents
- 1. How does it work
- 2. How do I activate an event for the event overview?
- 3. The Sweap Javascript Client
Implementing the event overview page within your website
 Updated
by Julia Walther
Updated
by Julia Walther
- 1. How does it work
- 2. How do I activate an event for the event overview?
- 3. The Sweap Javascript Client
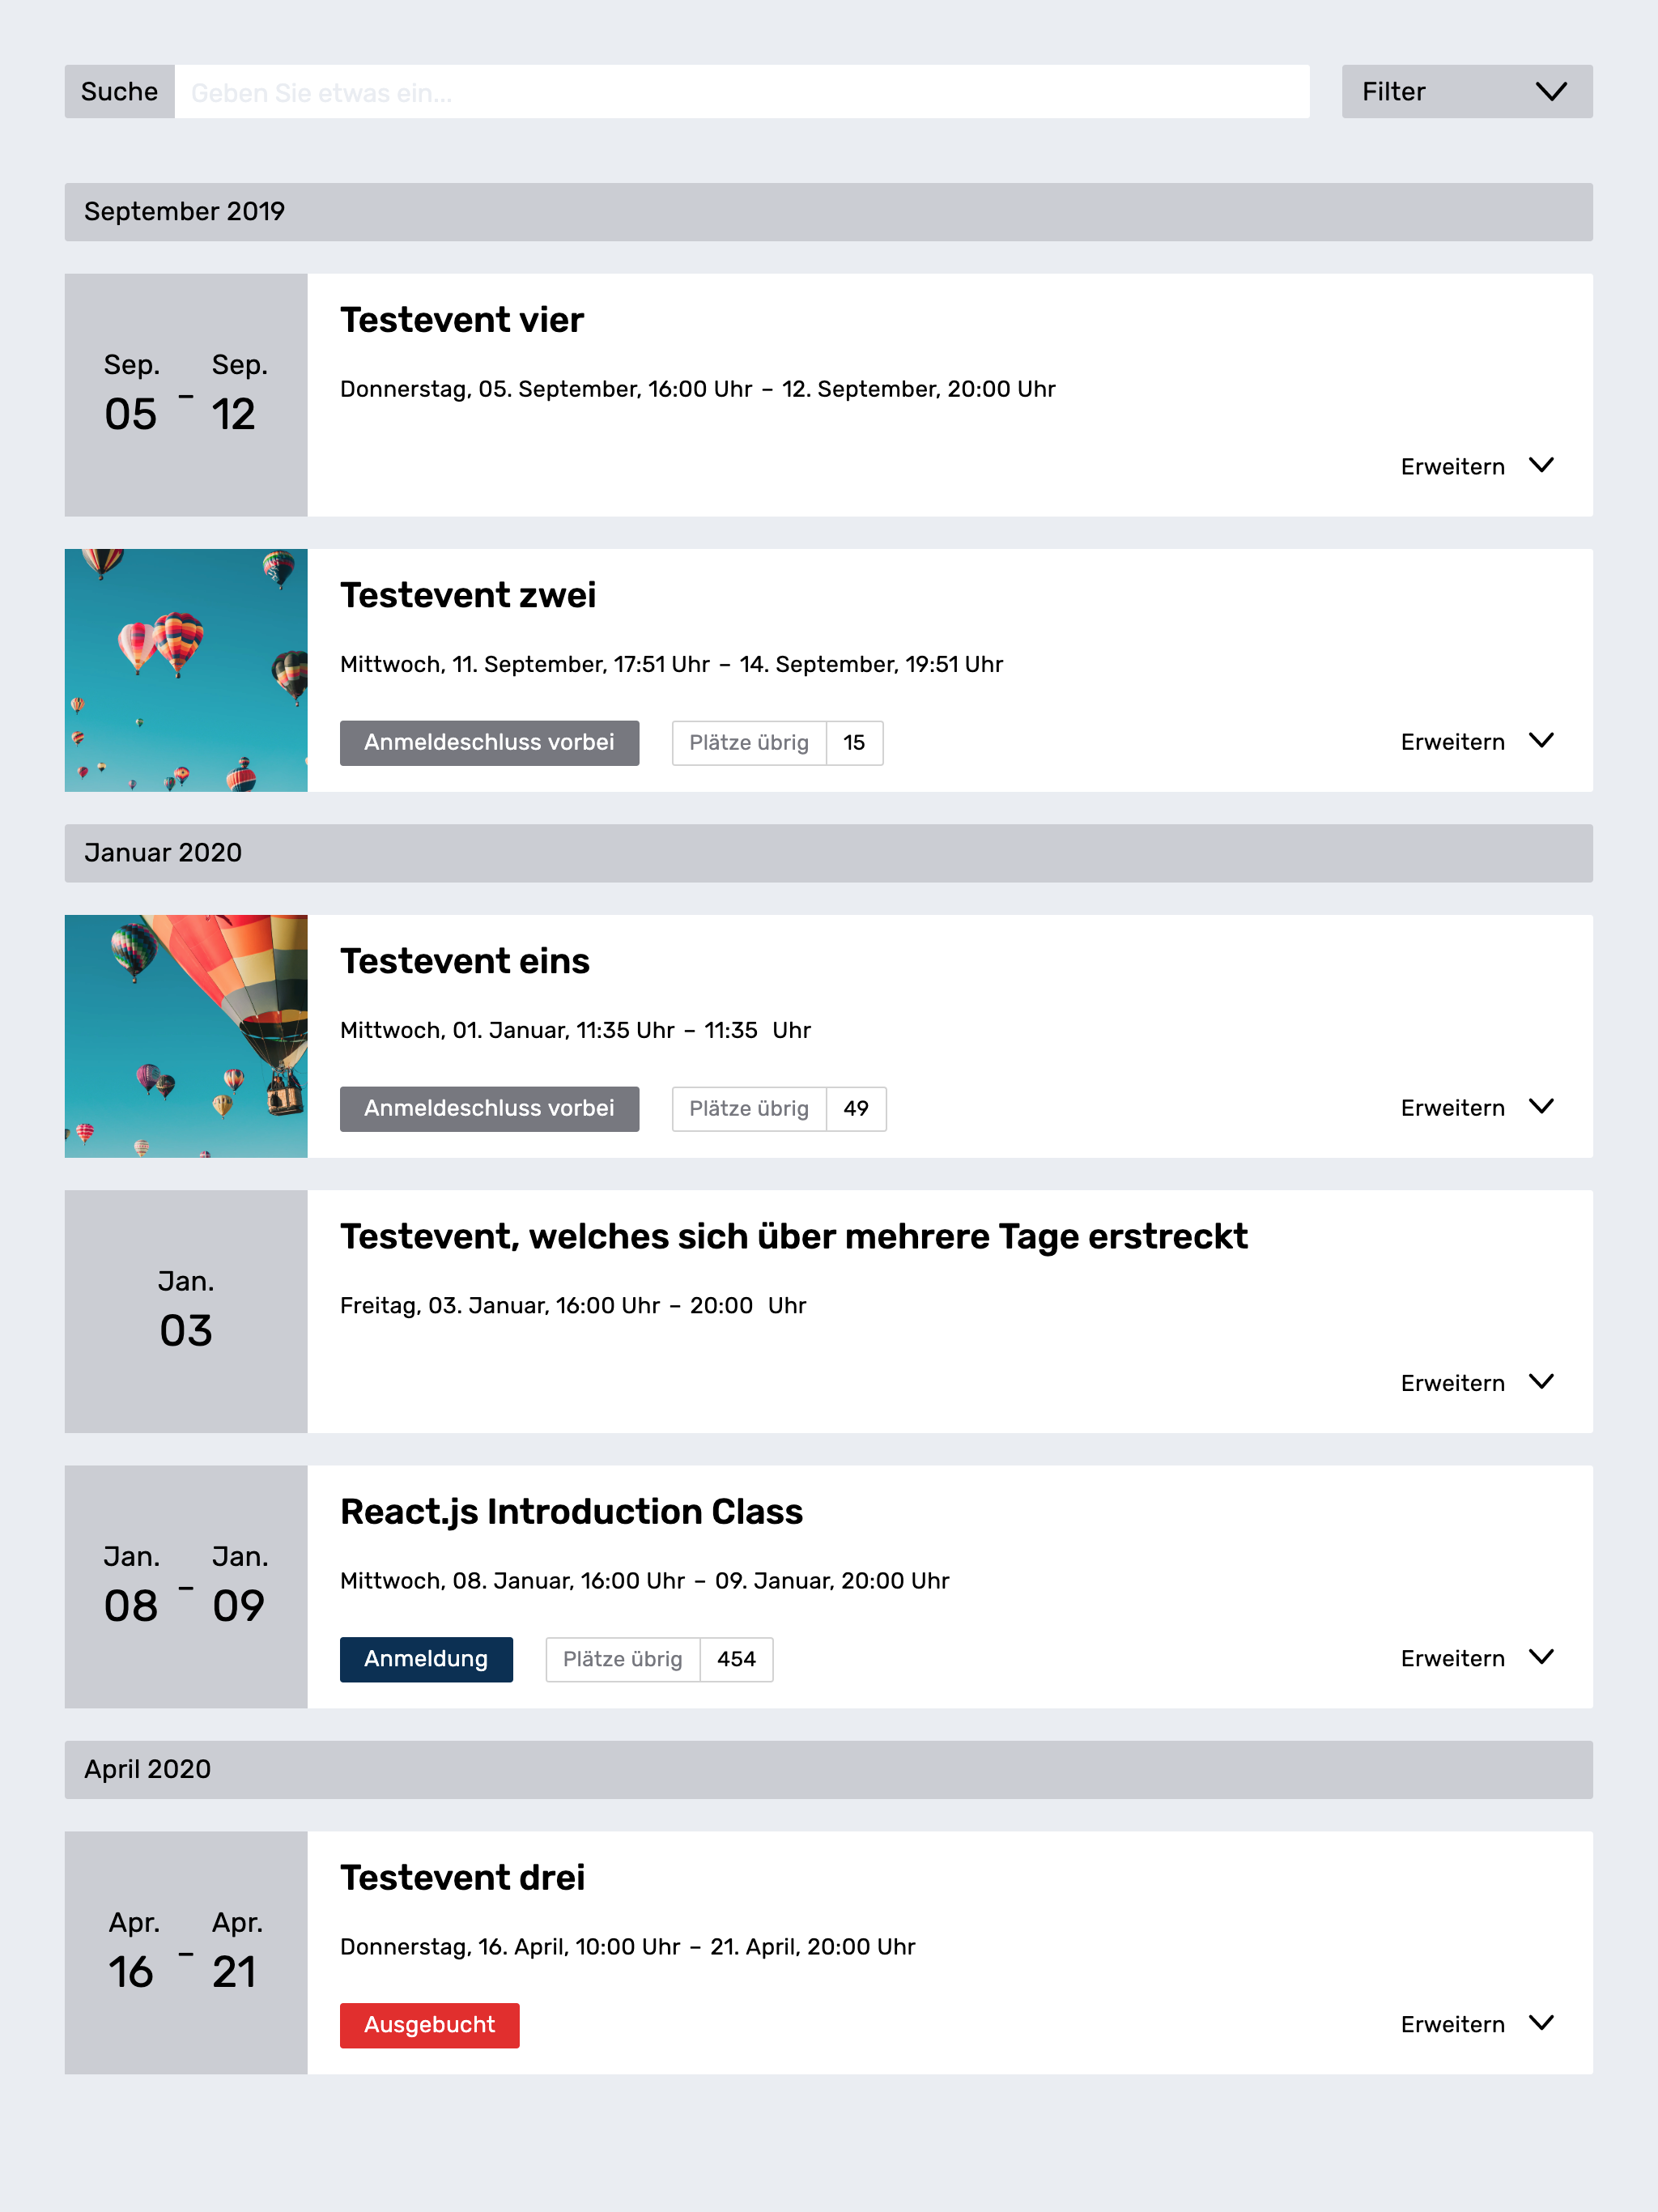
The events overview page was created to help our clients display a list of selected events on their own website. This feature is targeted to our customers who have a lot of events which are open to public registration and which they want to share / list on their website.
1. How does it work
The event overview page is a javascript client included in your webpage (see next block) which pulls and shows all events which are configured to support the overview page. To activate an event for the overview page create a registration page and activate the publication in the step "Publication on Overview Page". You can also provide an alternative event name, an event description and an optional event image.
Event overview pages are a premium feature of Sweap. To get access, please contact the Sweap sales team: sales@sweap.io
An example of the implemented overview page can be found here.
2. How do I activate an event for the event overview?
2.1. Adjustment of role rights and the creation of tags
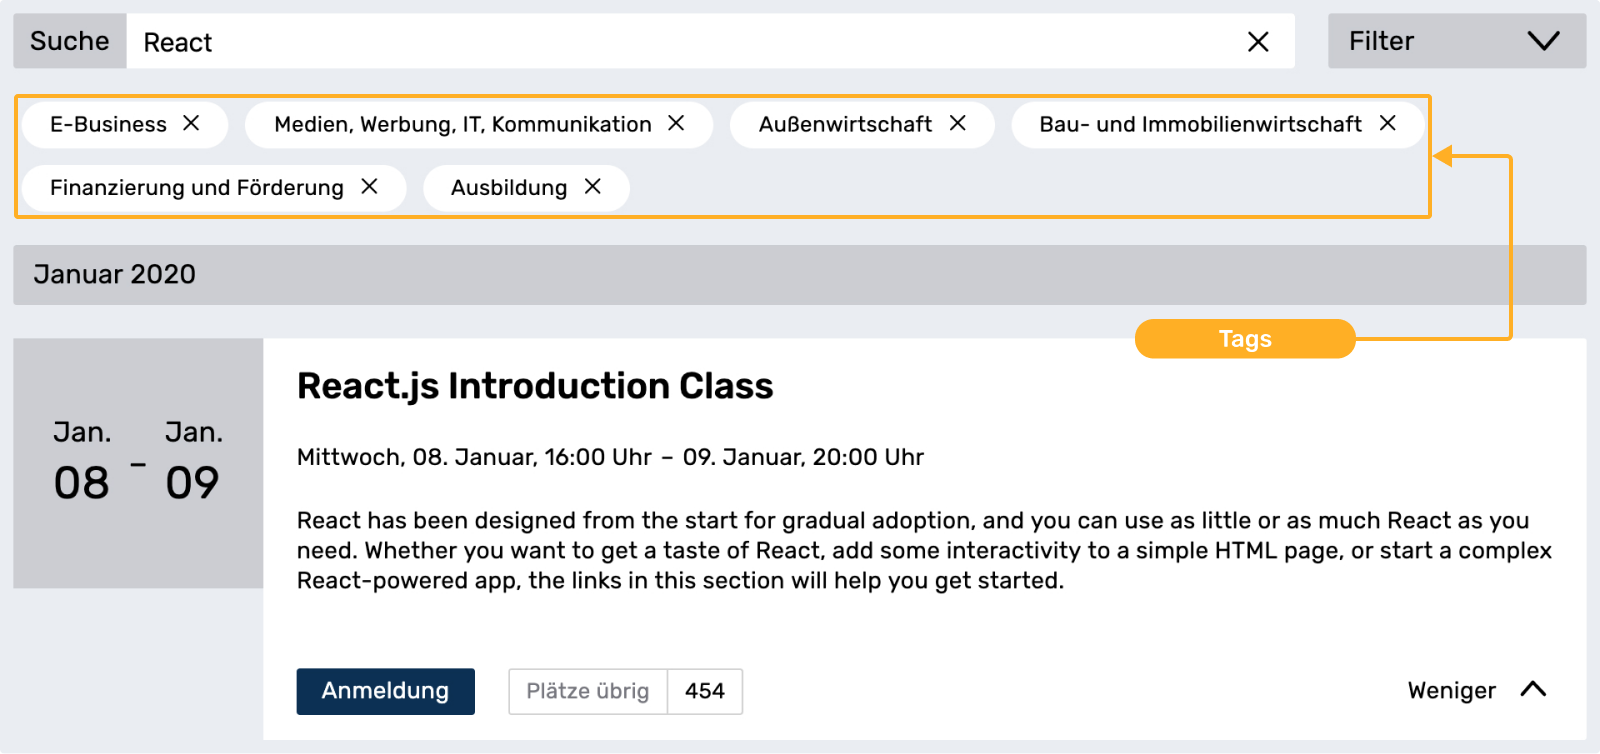
Using tags, it is possible to narrow down the events displayed on the overview page according to certain subject areas or keywords.
2.1.1 Tags
2.1.1.1 Extend Role Right
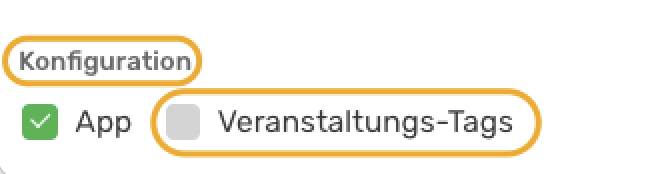
To do this, go to the menu "Users & Roles" to "Roles" and select the role you want to expand.
In the "Role", activate the right "Event tags" in the area "User and account" under the point "Configuration".
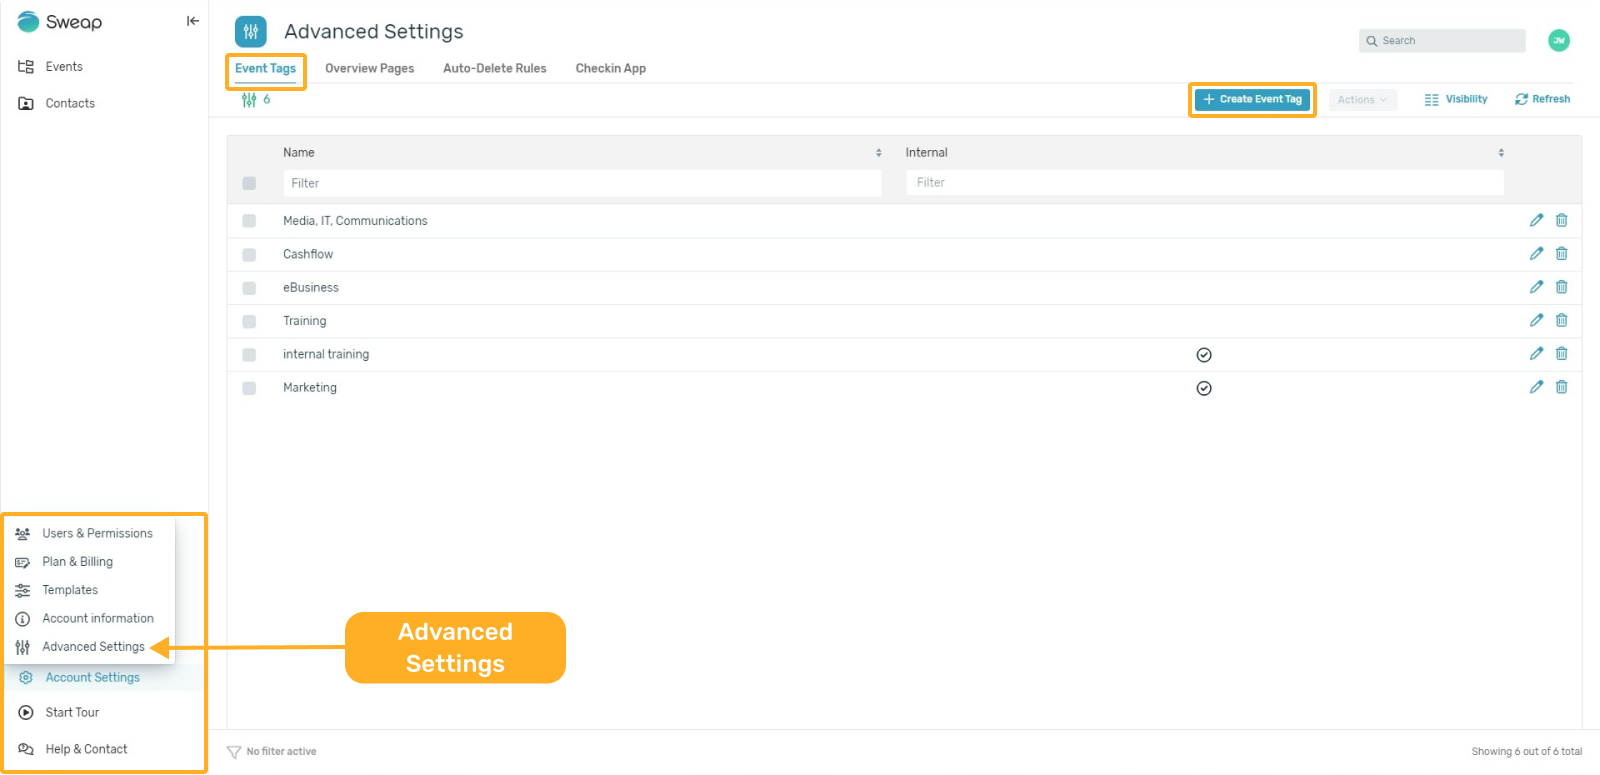
2.1.1.2 Create Tags
after you have added the right, you can create as many tags as you like for your Sweap account.
To do this, go to the "Settings" tab in the account dashboard and open the "Event tags" submenu. Here you can add one or more tags via the button "Create event tag".
2.1.2 Publish event on the overview page
2.1.2.1 Extend Role Right
Here, too, the role (Admin) must be extended by a right. To do this, open the "Invitation and registration process" area in the role and activate the "Publish on overview" right under "Websites".

2.1.2.2 Publish event
To activate an event for the overview page, create a registration page and activate the publication in the step "Publication on the overview page".
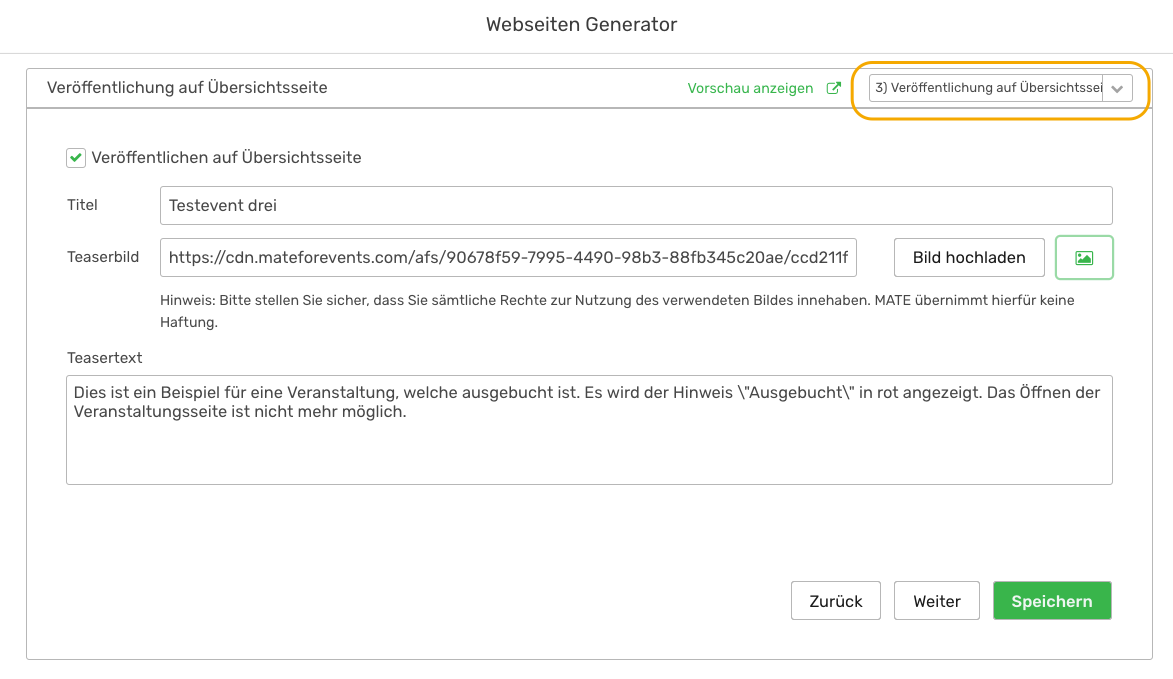
2.1.3 Create event overview - Create data-ID (optional)
In the Account Settings menu area, select the "overview pages" submenu. Now you can add a new data-ID by clicking on the button "create event overview".
You can make further adjustments to the key in the next steps.
Limit: Here you can define how many events on your website should be displayed in the overview. If you do not enter a value, all active events will be displayed.
Filter - visibility groups: Prerequisite: visibility groups have been created in advance. Only events assigned to the selected visibility groups are displayed. If no visibility groups are selected, all events are displayed.
Filter - tags: Prerequisite: event tags have been created in advance. Only events to which the selected event tags have been assigned are displayed. If no tags are selected, all events are displayed.
Filter - event name (regex): By supporting regex, I can use this filter to control which event names I want to have displayed. Example: Show me all events with the word "education" in the title.
3. The Sweap Javascript Client
Sweap offers you an easy-to-use Javascript client based on React, which you can embed in your site and easily customize.
3.1. How do I include the event overview page in my webpage?
You have to include a single HTML element (<div> with the id sweap-overview-container) into your HTML code where you want the list to appear. The HTML element contains a unique event-overview-page id to identify your account (if you are interested, feel free to contact Sweap to get this ID). Furthermore you need to link two CSS files and a javascript file. You also load the following scripts in your page:
- The JavaScript-Client: This React-based client uses a unique event-overview-page id to load and display the selected events.
- The Base/Main-CSS: this is absolutely necessary for the display of the Sweap Client and should not be changed.
- The Brand-CSS: the content of this file should be self-hosted and can be customized to design the Sweap Client yourself. You can find more information on this in the section “Customizing the overview page”
3.1.1 Example implementation code
<html>
  <head>
    <title>Sweap Veranstaltungsübersicht Beispiel</title>
    <link
      href="https://commons.sweap.io/js/registration_page_overview/1.2/css/sweap-main.css"
      rel="stylesheet"
    />
    <link
      href="https://commons.sweap.io/js/registration_page_overview/1.2/css/sweap-brand.css"
      rel="stylesheet"
    />
  </head>

  <body>
    <div
      id="sweap-overview-container"
      data-account-id="[YOUR ID]">
    </div>
    <script src="https://commons.sweap.io/js/registration_page_overview/1.2/js/">
    </script>
  </body>
</html>
If you do not have the option to edit your <head> HTML area, it is also possible to only use the following Javascript snippet inside of your <body> tag:
<div
	id="sweap-overview-container"
	data-account-id="xxxxxxxx-xxxx-xxxx-xxxx-xxxxxxxxxxxx">
</div>
<script src="https://commons.sweap.io/js/registration_page_overview/1.2/js/"></script>
<script>
	sweap_addCss('sweap_main_css', 'https://commons.sweap.io/js/registration_page_overview/1.2/css/sweap-main.css');
	sweap_addCss('sweap_brand_css', 'https://commons.sweap.io/js/registration_page_overview/1.2/css/sweap-brand.css');
</script>
3.1.2 Publish on an external event overview page
You want to publish your events together with another Sweap user on an event overview page, e.g. on a topic-specific external website that you and your partner manage together? This is possible and you only need to share the VAÜ Data ID with your partner. The partner inserts the ID received from you into his HTML code. The following example illustrates the procedure.
Your VAÜ Data-ID: xxxxxx-xxxx-xxxx-xxxxxxxxxxxx
Partner VAÜ Data-ID: yyyyyy-yyyy-yyyy-yyyyyyyyyyyyyy
In the part of the HTML code block after your VAÜ Data-ID, insert a comma "," and then the VAÜ Data-ID of your partner, as shown in the following example. You can get the VAÜ Data-ID from your partner.
    <div
      id="sweap-overview-container"
      data-account-id="aaaaaaa-aaaaa-aaaaaaa-aaaaaaaa,bbbbbbb-bbbbbb-bbbbbb-bbbbbbbbb">
    </div>
3.2. Custom styling of the overview page
The overview page uses two separate CSS files: sweap-main.css and sweap-brand.css.
sweap-main.css is holding the functional part of the overview app and must not be changed.
sweap-brand.css is a possible implementation of you brand information. You can use it as a base to tinker around with the styling of the page overview. Either you link to it in your html page and overwrite parts of it or you can copy all the styles into your page / css file and change them according to your needs. The following settings are part of the sweap-brand.css file:
3.2.1. OVERVIEW PAGE WIDTH
.sweap-rpo-app-width {
    max-width: 130rem;
}
3.2.2. COLOR
/* Color used as backgroud for: entire app and tag background */
.sweap-rpo-primary-color {
    background-color: #ffffff;
    border-color: #ffffff;
}

/* Color used as background for: input field label, filter label, months separator and calendar border */
.sweap-rpo-secondary-color {
    background-color: #cacdd2;
    border-color: #cacdd2;
}

/* Color used as background for: event text, calendar text, input text field and tag selector rows */
.sweap-rpo-tertiary-color {
    border-color: #fff;
    background-color: #fff;
}

/* Color for text */
.sweap-rpo-text-color {
    color: #000;
}

/* Color for lighter text used for number of seats available in event */
.sweap-rpo-light-text-color {
    color: #777880;
}

/* Search icons */
.sweap-rpo-search-icon-color {
    fill: #000;
}

/* Arrow icons */
.sweap-rpo-arrows-icon-color {
    stroke: #000;
}

/* Styling for "registration open" button */
.sweap-rpo-registration-btn {
    background-color: #0a3054;
    color: #fff;
}

/* Styling for "deadline is stil open but event is fully booked" button */
.sweap-rpo-fully-booked-btn {
    background-color: #e12e2e;
    color: #fff;
}

/* Styling for "deadline is past due" button */
.sweap-rpo-reg-deadline-over-btn {
    background-color: #777880;
    color: #fff;
}

/* Border color that user sees when hovering over tags in tag selector*/
.sweap-rpo-tag {
    border-color: #E9EDF1;
}
.sweap-rpo-tag:hover {
    border-color: #CACDD2;
}

/* Border color in event for smartphones and small viewports*/
.sweap-rpo-expand-line-phone {
    border-color: #e9edf1;
}

/* Animation indicator while app is fetching the events */
.sweap-rpo-loading-indicator {
    background-color: #7e7e7e;
}

/* Full border radius on elements*/
.sweap-rpo-full-border {
    border-radius: 2px;
}
3.2.3. BORDER RADIUS (you can put it to 0px if you want your buttons to be sharp)
.sweap-full-border {
    border-radius: 2px;
}
.sweap-left-border {
    border-top-left-radius: 2px;
    border-bottom-left-radius: 2px;
}
.sweap-right-border {
    border-top-right-radius: 2px;
    border-bottom-right-radius: 2px;
}
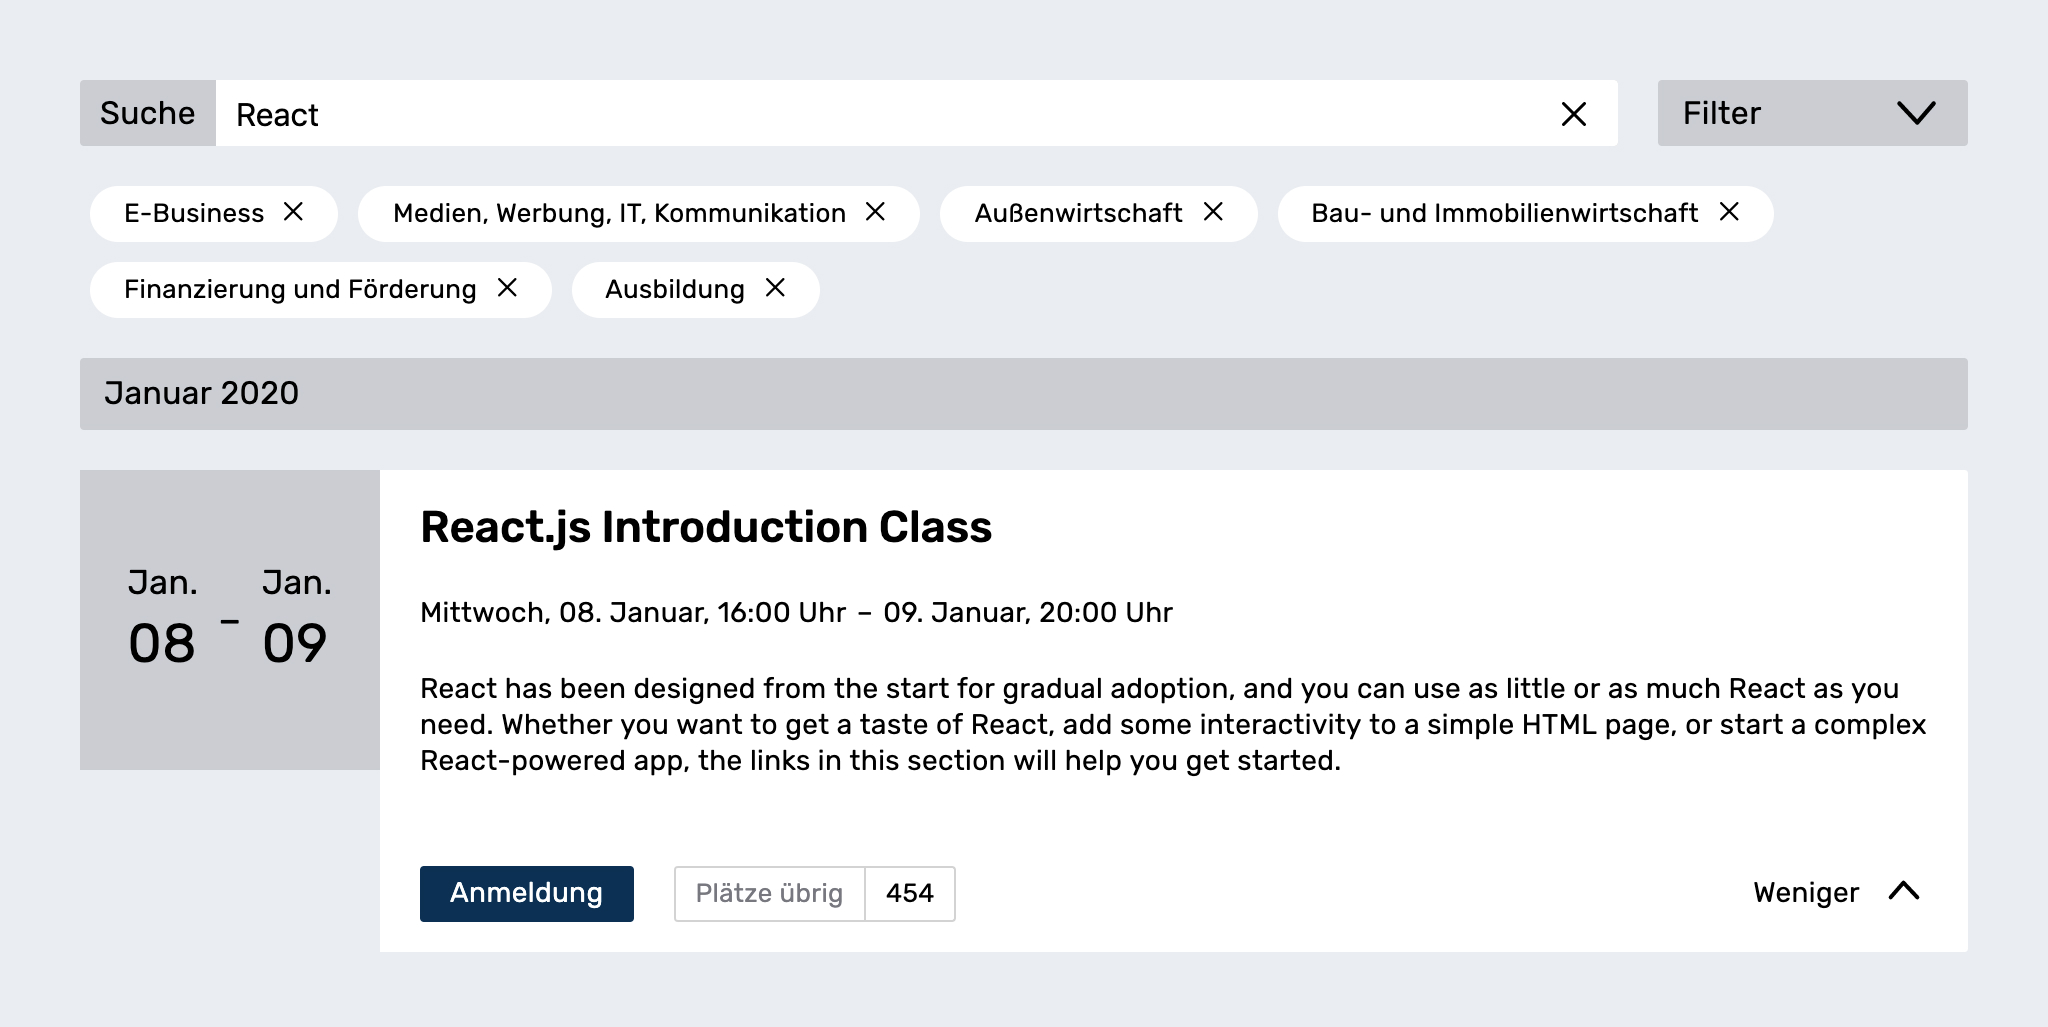
The search field can be used to search in the title and description of an event. If tagging (optional feature) is used, the events can be filtered for certain tags. It's possible to group tags into sections. For information on how to do this, please contact your Sweap Support team: support@sweap.io
- It's possible to hide events once they are fully booked by adding hide-fully-booked="true" to our div container when you are embedding him into your website:
<div id="sweap-overview-container"
     data-account-id="xxx-xxx-xxx-xxx"
     hide-fully-booked="true">
</div>
4. API / Interface
If you would like to integrate the events from Sweap into an existing event overview or otherwise use them through your system (for example, to integrate them into the search function of your CMS), it is a good idea to access our event overview interface directly.
All that is needed is an HTTP GET request to the URL
https://api.sweap.io/webclient/v1/registration-pages?overviewIds=[event-overview-IDs]
Comma-separated UUIDs that identify your account and that you can obtain from the Sweap team. For test data, you can simply replace [UUIDs] with "testdata". In response, you will receive a JSON array with the following information:
Field name | JSON Data typ | Description |
uuid | String | Unique identification number for an event |
name | String | Internal name of the event |
startDate | Date* | Start date and time of the event in ISO format |
endDate | Date* | End date and time of the event in ISO forma |
location | Object | Venue of the event consisting of:
|
title | String | Title for event overview |
teaserText | String | Teaser text for event overview with potential line breaks |
teaserImageUrl | String (URL) | URL to the teaser image for the event |
publicRegistrationUrl | String (URL) | URL to the public registration page in Sweap. Use this URL to link to the event registration. |
registrationClosedDate | Date* | Date from which the registration page is closed. Zero if no registration deadline is set. |
openRegistrationSlots | Number | Quantity of free places. At zero, no more registration is possible. Zero if no limit has been set. |
tags | List of objects | List of tag objects that can be defined for an event and are unique in the account. A tag object consists of these properties:
|
*) Date is a string in ISO 8601 format yyyy-MM-dd'T'HH:mm:ss.SSSZ
5. Example JSON
[
   {
      "uuid":"95a6f8ca-4000-44d1-96a3-d9ad666fca9e",
      "name":"MATE Release Party",
      "startDate":"2021-04-23T12:00:00.000Z",
      "endDate":"2021-04-23T14:00:00.000Z",
      "location":{
         "latitude":52.5020105,
         "longitude":13.3303865,
         "textRepresentation":"MATE Development GmbH",
         "formattedAddress":"Rankestraße 9, 10789 Berlin, Deutschland"
      },
      "title":"TEST",
      "teaserText":"Lorem Ipsum",
      "teaserImageUrl":"https://www.mateforevents.com/assets/logos/mate-logo.svg",
      "registrationClosedDate":"2021-01-20T18:00:00.000Z",
      "openRegistrationSlots":500,
      "tags":[
         {
            "uuid":"2639374c-b5ed-419c-bc07-3171e6a56468",
            "name":"Tag2"
         },
         {
            "uuid":"00a02349-ba99-490a-a84a-498e20681648",
            "name":"Tag1"
         }
      ],
       "publicRegistrationUrl":"https://app.mateforevents.com/r/matereleaseparty"
   }
]