Sweap set up for admins
Account setting
Administrator's guide to setting up your account
General account settings
Enable AI Feature
The event tags - creation and usage
Create guest fields for your account
Adding deletion rules to automatically delete guest data
Set up templates
User roles and permissions
Permission sets - Default user roles in Sweap
Permissions and configuration of default permission sets
User permissions and their functions in Sweap
Setting up new users
Use single sign-on
Roles and permissions
Visibility groups
Event-Ticketing - e-payment with Sweap
API and publishing package function
Implementing the event overview page within your website
Implementing the event overview page in an IHK24 website
Use Sweap's Zapier integration
Import of distributors with EVA
Import groups and committees from EVA master data
Sweap app and devices for check-in
Set up domain and email address
Getting started with Sweap - Basics
Event overview and dashboard
Basic structure of the event overview
The action field and its functions
The calendar view for your events
The event dashboard - overview
Event Sustainability Widget
Basic functions
Event formats in Sweap
What are event series?
Single event creation with Sweap
Create event series in Sweap
Create sessions for your event series
Using time zones in Sweap
Duplicate an event to use it as a template
The preview mode for creating emails or webpages
Using the correct image sizes
Create text with the HTML-Editor
AI feature in use in HTML editor
Use placeholders in Sweap
Customize headlines and text with HTML
Linking emails and websites in Sweap
Legal notice and privacy policy
Support and data protection at Sweap
GDPR-compliant consent management and cookie banners
Tracking-Tools on your Sweap event pages
Data tracking with Sweap
Privacy policy and GDPR
Questions about security & data protection
Sweap AI - Questions about security & data protection
Increasing security - introduction of Keycloak
Session limits - session limitation
Send your feedback about Sweap
The withdrawal button (Section 356a BGB) – implementing it with Sweap
Personal settings
Search and filter functions
The search function in Sweap
Using the filter function in Sweap
Last Update and Last Reply of your guests
Best practice, online webinars and updates
Create and manage contacts and guests
Create, import and export guest information
Add guests to your list
The guest import with Excel
Edit guest information and change status manually
Export your guestlist
Create and manage contacts
Add companions
Manage attributes for guests and divisions
Standard Fields and Event-Related Information in the Guest List
Create and edit attributes
Segmenting guests by categories
Postal mail invitation and QR code
Setting up and sending emails
Setting up and configuring emails
The email types and their use
Create mails more efficient with using the duplicating function
Testing emails in the editor: Here's how it works
Individual salutation
The guest salutation
Create guest salutation with our salutation assistent
Use your own salutation form in your emails
Dynamic email builder
Dynamic email builder: Create emails
Guest-Links and Token: Efficient Event Communication
Configure emails using a dynamic modular system
Design your email - Content
Design your email - Rows
Design your e-mail - General
Email wizard
The different types of email templates
The Email template LA LUNA
Static email wizard: creating emails
Configure emails - set up an invitation email
Call to Action Button withinin emails
Insert links for virtual events into emails
Insert stock photos into emails
Font types in emails
Troubleshooting for emails
Opt-In states and bounces
Reduce spam probability of emails
Display images correctly in my email
Delivery notification and bounces in the email log
Basics for the successful delivery of emails
Tracking email opening rates
Important information about blocked email addresses - status "mailjet: preblocked
Sending out emails
Registration pages & Virtual event platform pages
Registration page basics
Creating a registration page - basic steps
Metadata and SEO for registration pages
Deactivate event pages (URL link tracking)
Schema.org: Structured data for your event registration page
Registration page - using the Website Builder
Registration page - using the websitze wizard
Templates for your webpage
Contents and modules of a registration page
Texts, colours and design for the registration page
Settings to close the registration page - Website Wizard
Registration options settings within the Website Wizard
CSS & Java Scripts for website customisation
Header and footer within a website
Publish events on your own website
Font types on websites
Setting up the registration form
Configuration of a registration form
Add a checkbox with URL to the registration form
Show and hide form fields
Enter accompanying persons (registration form)
Newsletter Integration
Virtual Event Platform
Integrations and modules for the Virtual Event Platform
Operate and monitor events with Sweap
Label printing
Monitor events
Event status and the stages of your events
Postponing and cancellations of events
The confirmation status from guests
Event Insights - The key figures of your event
Sweap guestlist app and check-in
Sweap Budget
All on plans and licenses
Table of Contents
- All Categories
- Registration pages & Virtual event platform pages
- Registration page - using the Website Builder
- Registration options settings within the Website Builder
Registration options settings within the Website Builder
You have different possibilities to invite your guests to your events via Sweap. Basically, this can be differentiated by your guest segment.
To build your registration page, you should therefore consider whether you want to invite guests from existing distribution lists / guest segments to your event or whether you want to reach new people from whom you do not yet have any data (collection of new guest data).
According to this consideration, you can make your registration page publicly available or build your registration page so that it is only accessible to invited guests.
Following we will explain which functions are available in Sweap, where you can find them and for which use case they are suitable.
Registration options settings
You can find the registration options settings in the edit mode of your registration page. Click on the button with the small cogwheel symbol to open the settings section.
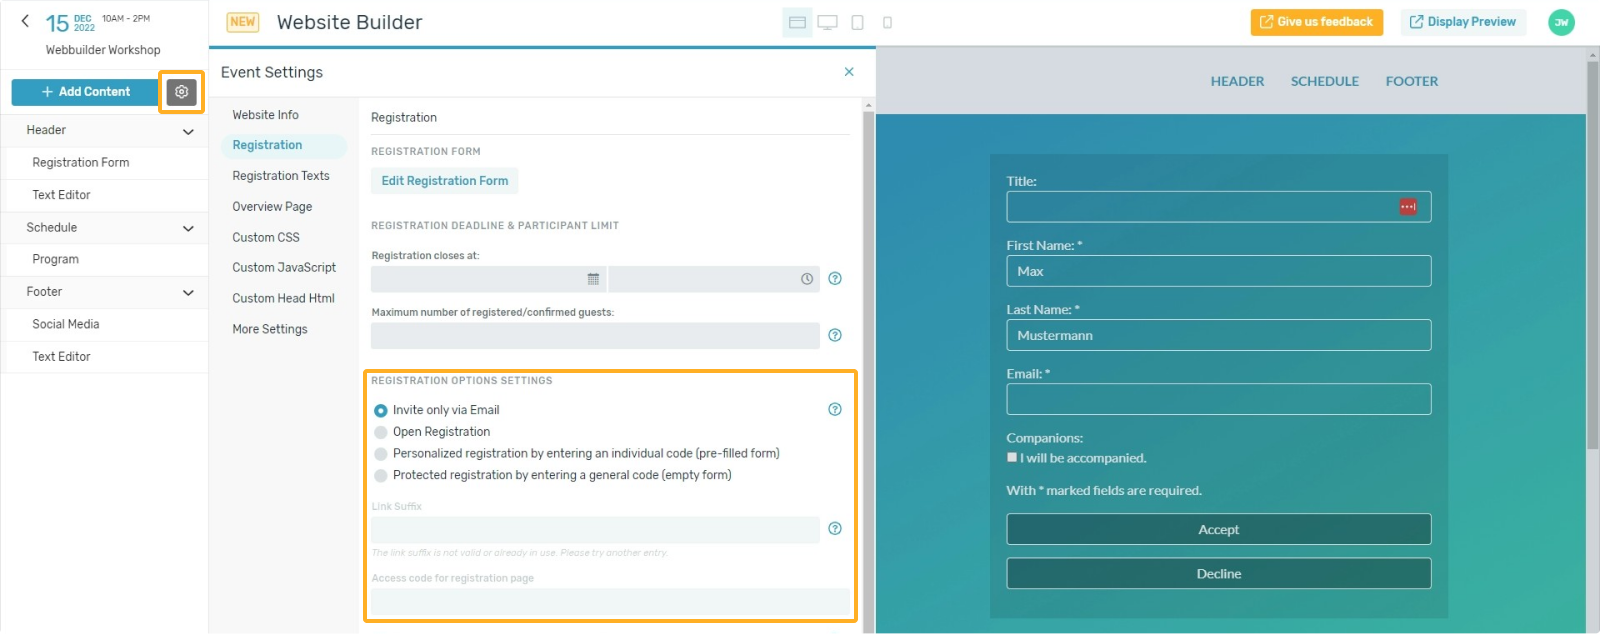
You have the following options:
- Invite only via Email
- Open Registration
- Personalized registration (by entering an individual code)
- Protected registration (by entering a general code)
Invite only via Email
Select this setting if you want to invite only by personalized invitation emails via Sweap. This assumes that you are working with a distribution list of guests you already know. Your guest will then receive his personalized invitation link with his invitation email, which he can use to register for the event. Please note that if invitation emails are forwarded, the guest record of the originally invited guest will be overwritten - new guest records cannot be generated with this form of registration page setting.
Open Registration
Select this option if you want to create an open registration page. In this case, any potential guest who knows the link to your registration page can register. In this variant you can also invite already known guests from Sweap via invitation email. You create a mixture of open registration and closed registration. The invitation email, which you can send to already known mailing lists, also contains the personalized invitation link of your guest, so that he finds a pre-filled form despite the open registration. Please note that even with the open registration page, the guest record would be overwritten if your guest forwards his personalized invitations.
Personalized registration by entering an individual code (pre-filled form)
You can use this setting if you want to invite your guests to your event by mail. The individual registration code is the personal invitation code of your guest. With this option, your guest will be prompted to enter his or her individual code when accessing the registration page - only after the code has been successfully entered will the registration form be available so that registration can take place. Since your guest receives a personalized code, our system recognizes the guest's record when the code is entered and consequently shows your guest a form pre-filled with the already known data. Please note, if a guest passes on their personalized code and another guest uses it to register for your event, this will overwrite the guest record of the originally invited guest - new guest records cannot be generated using this form of registration page setting.
Protected registration by entering a general code (empty form)
Select this option to allow your guests to register for an event using a generic access code. You set the registration access code yourself - don't forget to make it available to the people you want to allow to register. You can consequently enter new guest records with this setting. A conceivable scenario could be that you publish your registration page via your social media channels and make the generally valid code available there for a specific target group. This ensures that new guests from this target group can register for your event. Since this is the registration of new guest records, the registration form is not pre-filled in this case. This option also works in combination with personalized codes. Consequently, you have the possibility to send already known guests, whom you would like to invite to your event by mail, to this registration page - these guests in turn can then use their personalized invitation code for registration. In this case, our system will also recognize the guest record so that the form is pre-filled.
Link Suffix and Access code for registration page
Within the registration options settings there is also a field for the link suffix and a field for the access code for the registration page.
The suffix can be customized by you. You can customize it when you create an open registration page, a registration page with a custom code or a registration page with a common code. In these scenarios, you can specify what suffix your registration page link has. You don't need to customize the suffix - if you don't make any changes here, our system will take your event name as the suffix (it will be supplemented with a sequence of numbers and letters, if necessary, if the URL has already been used in our system).
The field for entering an access code for the registration page is only available if you use the setting "Protected registration (by entering a general code)". Enter the generic code that you want your guests to use for registration here.
We have pointed out to you in a few places that when invitations are forwarded, the original guest record may be overwritten. Of course you can prevent this. You can do this by changing the input mode for certain fields in your registration form.
How to do this is explained here.