Table of Contents
Linking emails and websites in Sweap
 Updated
by Julia Walther
Sweap offers you the possibility to create a targeted linkings between your web pages (registration page and virtual event page) and your communication tools.
This function is particularly practical if you want to invite guests from different segments to your events and accordingly request different registration information from your guests.
In this article, we present a practical example for which this function can be used. Of course, there are other use cases where this feature can be helpful.
In our example, we create a virtual event where we want to invite guests who speak different languages - in this case German and English. We are handling two different guest segments and would like to contact the guests in different languages, guide them through our registration and welcome them to the virtual event.
In order to ideally meet both guest segments, we will work with two invitation emails, two registration pages, two confirmation emails and two virtual event pages.
In principle, we will duplicate all our working tools and materials so that we can create them in both German and English.
It is important that the correct linkings are made within the emails and web pages.
1. Emails
As already mentioned, we create our emails in two languages. We have prepared an invitation email in German and one in English. In addition, we have created a confirmation email in German and one in English:

1.1 Invitation Emails
In the configuration of your invitation, you can specify under the point "Invitation Preferences" which registration page you would like to direct your guest to for their registration. There you will find the menu "Registration Page Selection". In the drop-down list you will see all the available registration pages that you have created in your event. Select the appropriate page and save your work.

1.2 Confirmation Emails
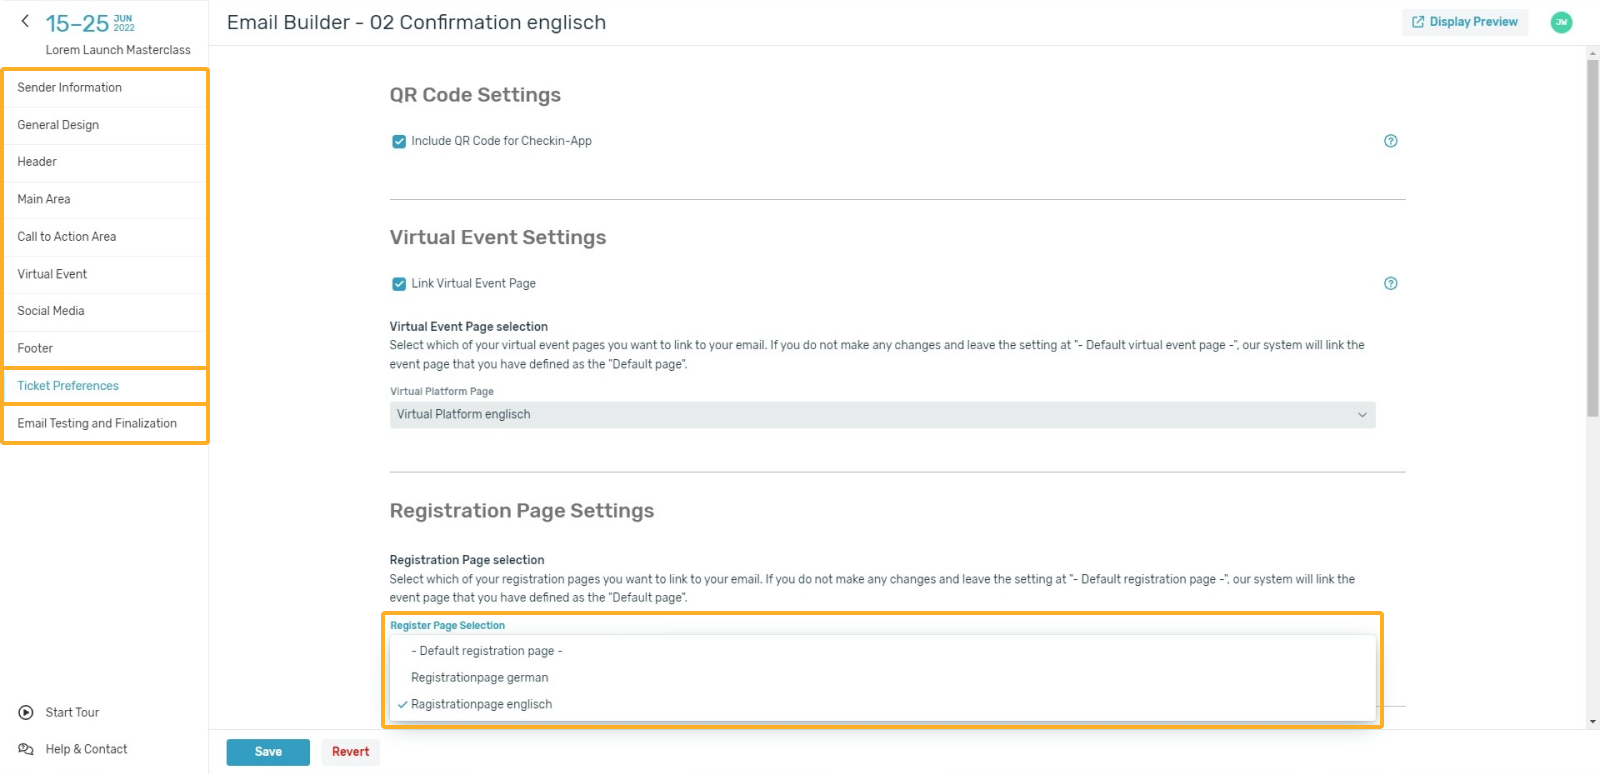
In the configuration of your invitation, you can set the Virtual Event Page to which you would like to send your guest under the point "Ticket Preferences". There you will find the point "Virtual Event Settings". First check the box to link your Virtual Event Page. A drop-down list now appears in which all your Virtual Event Pages created in the event are displayed. Select the appropriate page and save your work.

Besides linking the virtual event page, you can also select the registration page to which you want to send your guest if needed. This setting is important if you use e.g. placeholder links within your email. If you use placeholder links and do not link the correct / desired registration page, our system will automatically send your guest to the registration page defined as default - this may cause problems for your guests.
Why should you allow your guests to go back to your registration page later? Simply because plans can change. For example, a guest may no longer be able to confirm their attendance, but may want to change their commitment to a cancellation. This scenario can be handled by using placeholders that you can include in your emails. More information about this possibility can be found here.

In the last step of the configuration of your confirmation email, you have the option to define your email as "Automatic Confirmation". Please note that this step is not necessary if you link a confirmation email within the configuration of your Registration Page - we will explain this to you in the next step.

You can find detailed information on the topic of email configuration here.
2. Registration
According to our example, we have also set up our Registration Pages in German as well as in English. This gives us the possibility to display the information to our guests in their own languages and to guide them through the registration process in their own language.
Although we have also created invitation emails, our pages are set up as an open registration. In our example, we want to contact guests we already know as well as allow public registration.

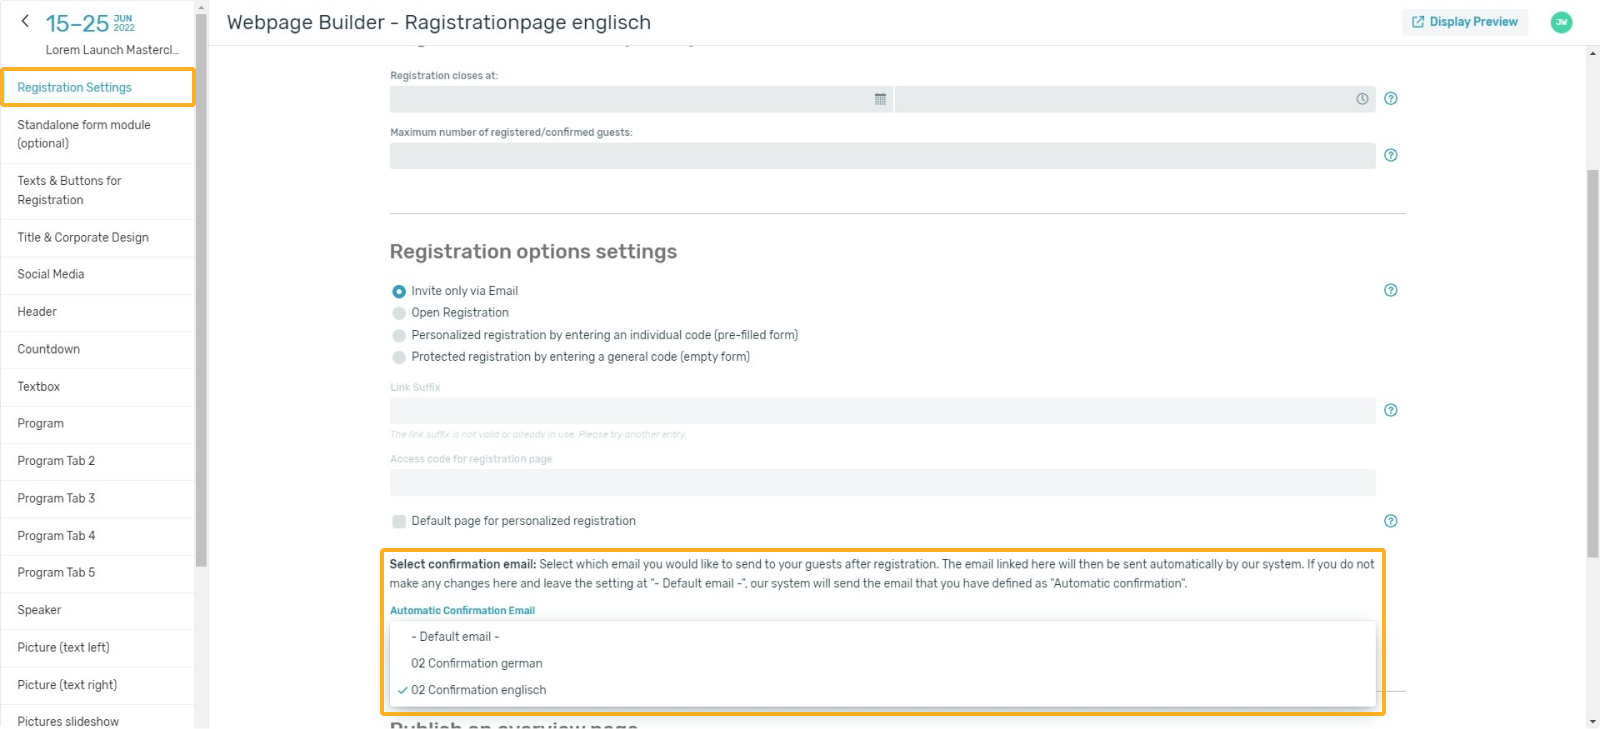
In the configuration of your Registration Page, under the point "Registration Settings", you can set which confirmation email you would like to send to your guest. There you will find the menu point "Select confirmation email". In the drop-down list you will see all available confirmation emails that you have created in your event. Select the appropriate email and save your work.

Note that if you create multiple registration pages to map a specific registration process for your guests, do not define your registration page as the default page for personalised feedback. This step is not necessary if you link your emails and web pages, as this will define direct rules.
3. Virtual Platform
We have created our Virtual Event Pages in German and English to match our example. Accordingly, we can then direct our guests to the corresponding language version of our virtual event.

The linking of your virtual event page is done exclusively in the configuration of your confirmation email - you find this step under point 1.2.
Additional information on creating the Virtual Event Page can be found here.
You can find more general information about creating websites in this article.
4. Use language settings within your emails
If you want to invite guests in different languages, as we did in our example, you can also add language settings to your emails.
You will find the menu for language selection under "Email Testing and Finalization". The selection you make here determines the language in which certain values, such as the date, are displayed. You can choose between the following settings:
- Event Language
- English
- German

If you select "Event Language", the language in which you have generally created your event is taken into account - this is therefore a "global" setting for your event. With the help of the language setting for emails, you can influence that a different language is used in your email. By the way, you can determine the event language when you create your event or change it later in the menu of your event under "Settings".
