Table of Contents
- 1. linkage/disconnection by user Settings
- 1.1 Link Zoom (via user profile)
- 1.1.1 To do this, open the menu "Settings" in the user profile in your account and click the button "Link with Zoom".
- 1.1.2 Then the page of Zoom opens automatically to log in.
- 1.1.3 Provided the login was successful, you will receive this request for authorization:
- 1.1.4 When the authorization is confirmed, the selected zoom account is linked to the Sweap reception page.
- 1.1.5 After you have closed the window, shortly "Refresh" and your Zoom account is successfully linked to Sweap.
- 1.2 Remove the link (via user profile)
- 1.1 Link Zoom (via user profile)
- 2.1 Open the "Conference" module in the Virtual Event Platform, scroll to the Workshop area and click on the green pencil icon.
- 2.2 A pop-up window then opens.
- 2.3 After pressing the button "Sign In" you will be redirected to Zoom to log in at Zoom.
- 2.4 Provided the login was successful, you will receive this request for authorization:
- 2.5 When the authorization is confirmed, the selected zoom account is linked to the Sweap reception page.
- 2.6 Select Refresh and then close the window.
Connecting Zoom to your virtual events
 Updated
by Ingo
Updated
by Ingo
- 1. linkage/disconnection by user Settings
- 1.1 Link Zoom (via user profile)
- 1.1.1 To do this, open the menu "Settings" in the user profile in your account and click the button "Link with Zoom".
- 1.1.2 Then the page of Zoom opens automatically to log in.
- 1.1.3 Provided the login was successful, you will receive this request for authorization:
- 1.1.4 When the authorization is confirmed, the selected zoom account is linked to the Sweap reception page.
- 1.1.5 After you have closed the window, shortly "Refresh" and your Zoom account is successfully linked to Sweap.
- 1.2 Remove the link (via user profile)
- 1.1 Link Zoom (via user profile)
- 2.1 Open the "Conference" module in the Virtual Event Platform, scroll to the Workshop area and click on the green pencil icon.
- 2.2 A pop-up window then opens.
- 2.3 After pressing the button "Sign In" you will be redirected to Zoom to log in at Zoom.
- 2.4 Provided the login was successful, you will receive this request for authorization:
- 2.5 When the authorization is confirmed, the selected zoom account is linked to the Sweap reception page.
- 2.6 Select Refresh and then close the window.
To include an event in Zoom Meeting / Zoom Webinar within a web session, you have to link your account with your Zoom account once. How to do this is explained below.
There are two different ways of linking. Either
- 1. via the user settings in the account or
- 2. directly via the Virtual Event Platform.
Prerequisite: You have an active zoom account.
1. linkage/disconnection by user Settings
1.1 Link Zoom (via user profile)
1.1.1 To do this, open the menu "Settings" in the user profile in your account and click the button "Link with Zoom".
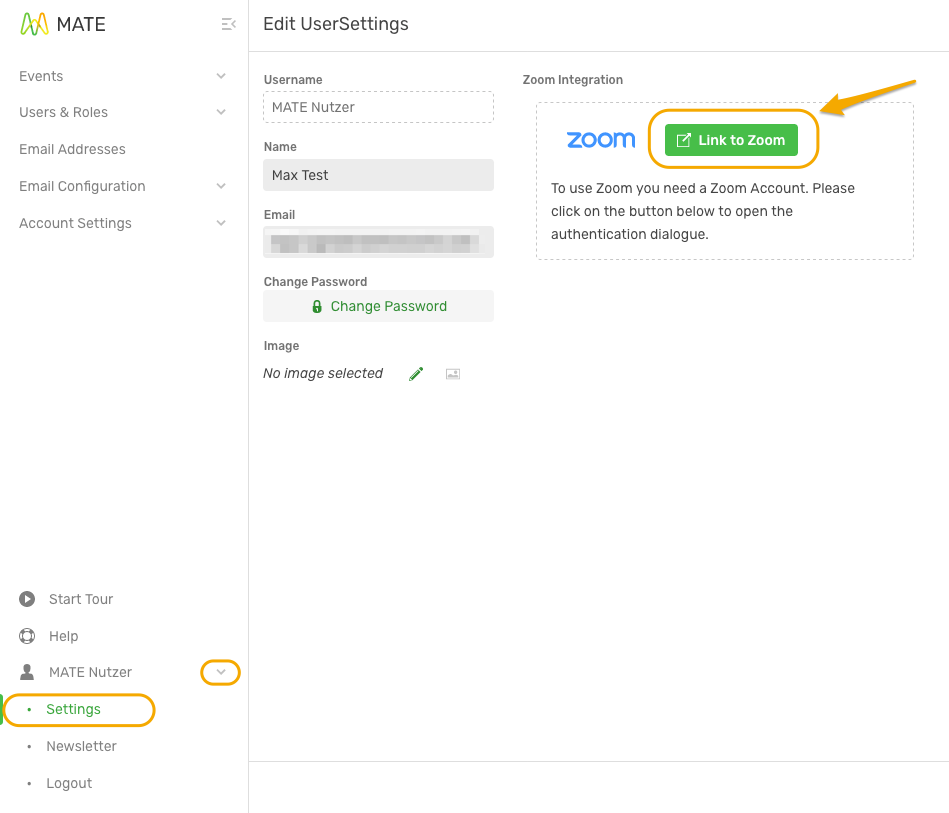
1.1.2 Then the page of Zoom opens automatically to log in.

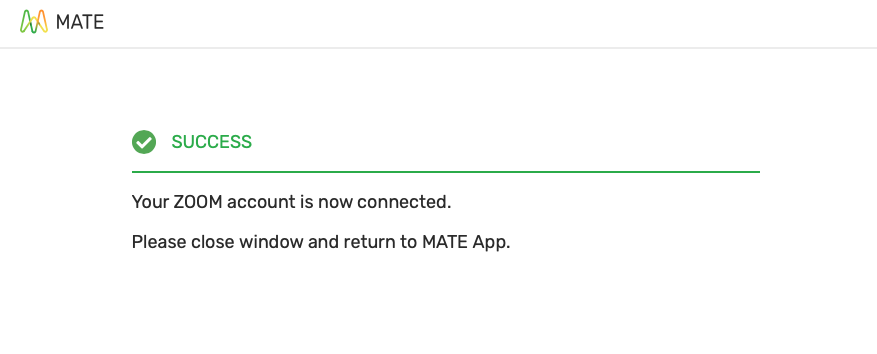
1.1.3 Provided the login was successful, you will receive this request for authorization:

1.1.4 When the authorization is confirmed, the selected zoom account is linked to the Sweap reception page.
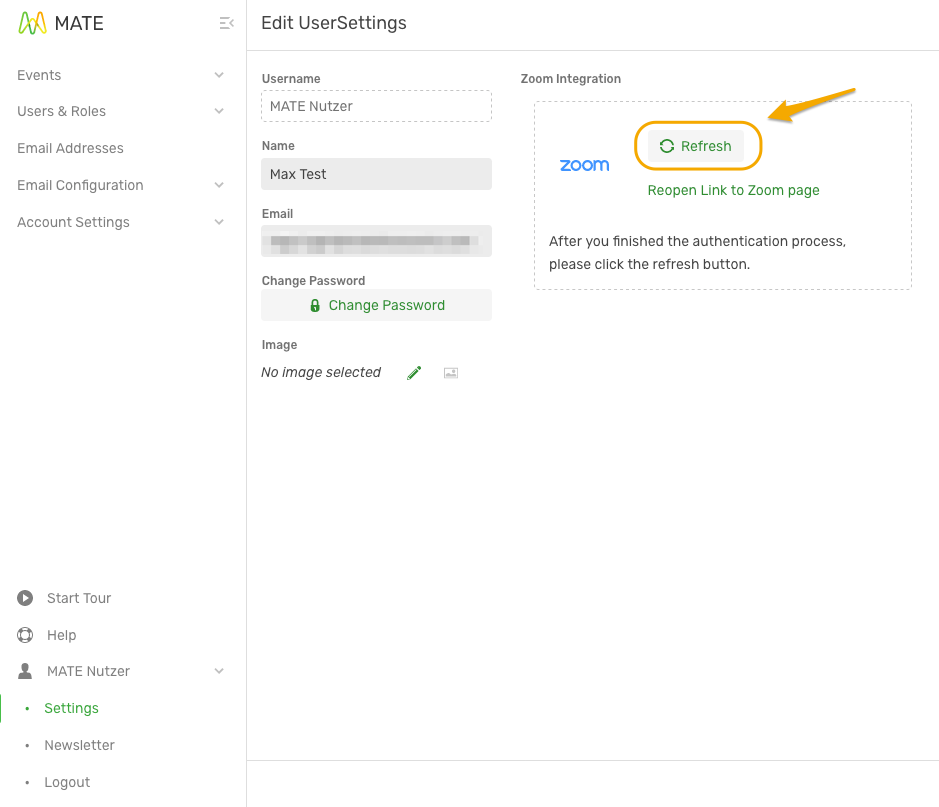
1.1.5 After you have closed the window, shortly "Refresh" and your Zoom account is successfully linked to Sweap.
1.2 Remove the link (via user profile)
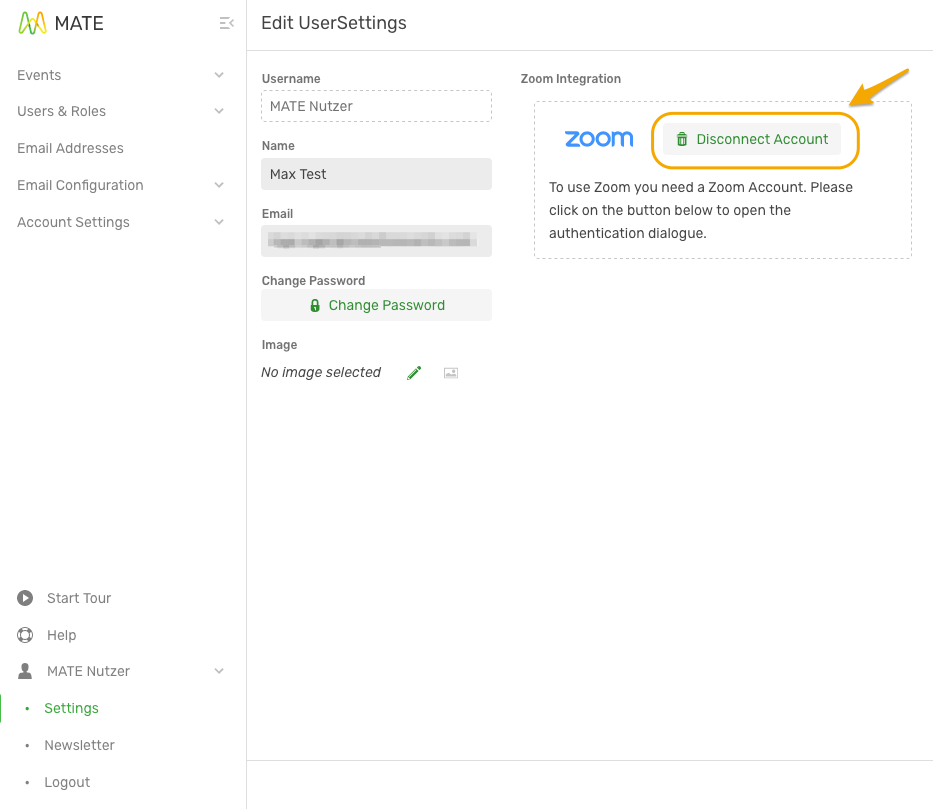
1.2.1 Open the "Settings" menu in the user profile. If there is a link to Zoom, you will find the button "Disconnect". As soon as you click on the button, the connection is automatically disconnected.
2. link via the Virtual Event Platform
2.1 Open the "Conference" module in the Virtual Event Platform, scroll to the Workshop area and click on the green pencil icon.
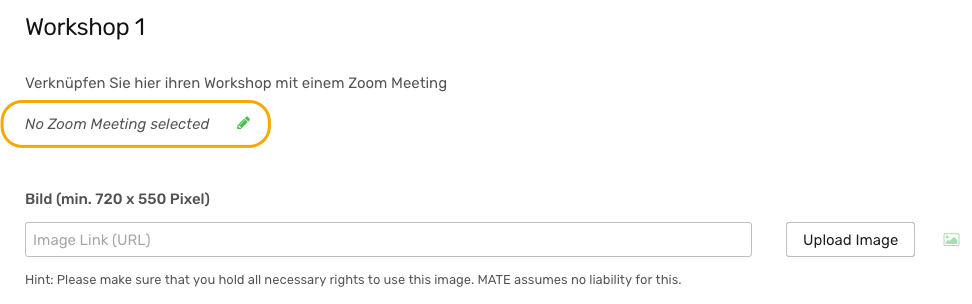
2.2 A pop-up window then opens.
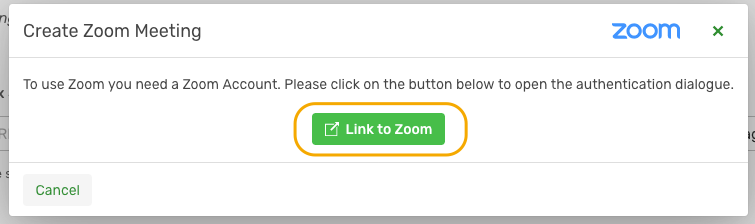
2.3 After pressing the button "Sign In" you will be redirected to Zoom to log in at Zoom.

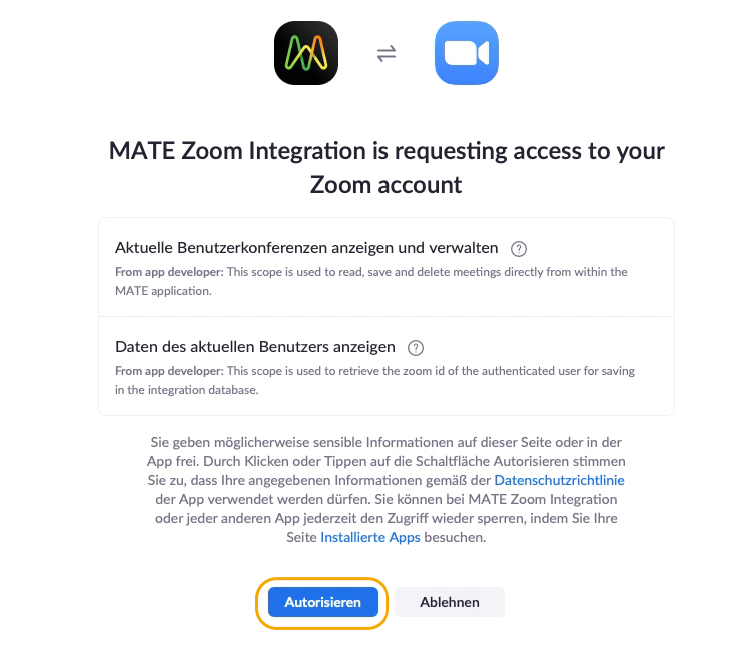
2.4 Provided the login was successful, you will receive this request for authorization:
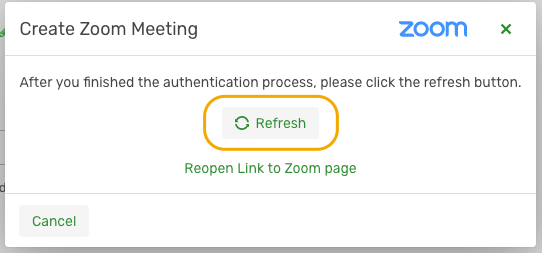
2.5 When the authorization is confirmed, the selected zoom account is linked to the Sweap reception page.

2.6 Select Refresh and then close the window.
From now on your Zoom Account is linked to Sweap and you can easily embed your web sessions.
3. alternative: disconnect link directly via Zoom
2. Disable the link between Zoom and Sweap
You can also use the Zoom Marketplace to remove an existing link between Zoom and Sweap. The deactivation (deinstallation) is done completely via your Zoom Account. We will explain how to proceed in the following steps.
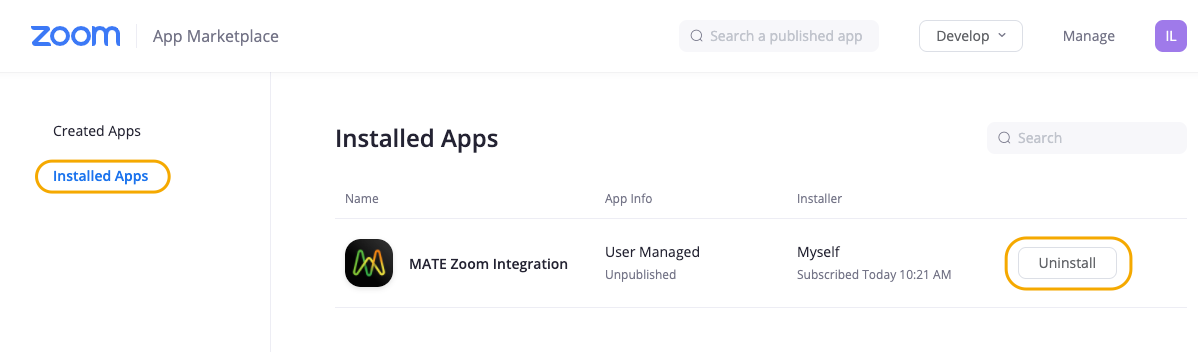
- Please open the following link: Overview Installed Apps
- select "Sign In" in the top right corner and log in
- Click the "Manage" button
- An overview of all programs you have linked with Zoom is opened
3.1 To remove the link to Sweap, simply click the "Uninstall" button on the right side of Sweap.
A window will then open to query the reason for the uninstallation.
3.2 Please select a reason and press the Uninstall button again.
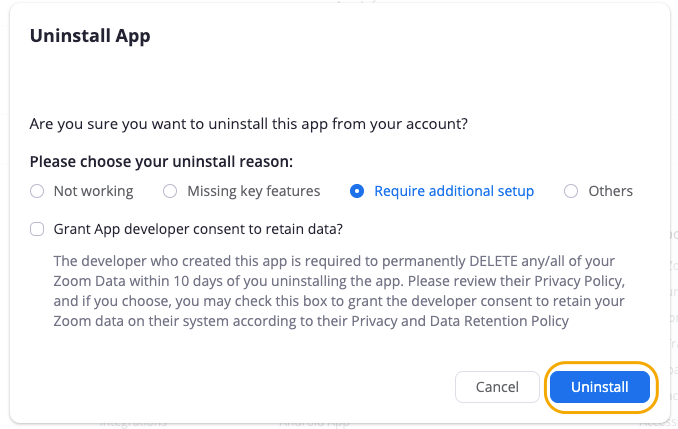
Afterwards a small message should appear, that the uninstallation was successful and the app should no longer appear in the overview.
More information about our Virtual Event Platform can be found in the article The all-in-one Virtual Event Platform for virtual and hybrid events.
4. Integration of Virtual Zoom Meetings on the Event Platform
4.1 The general integration
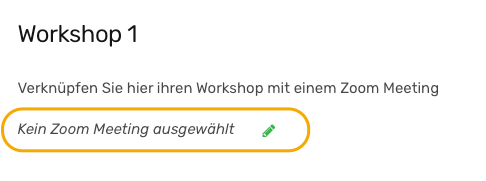
4.1.1 To do this, open the "Conference" module, scroll to the Workshop area and click on the green pencil icon.
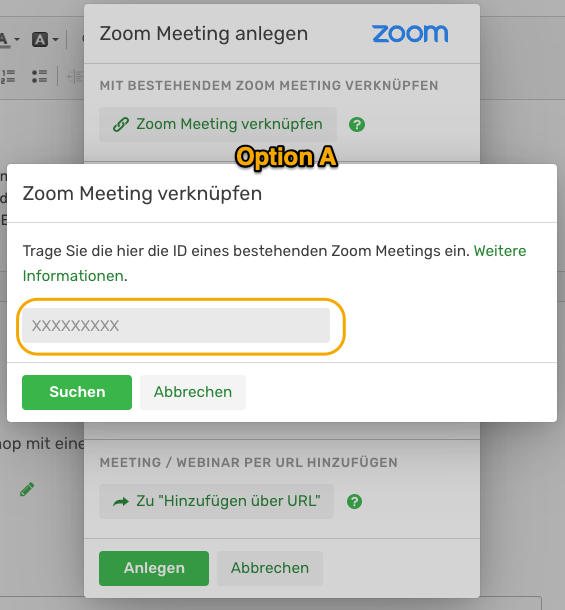
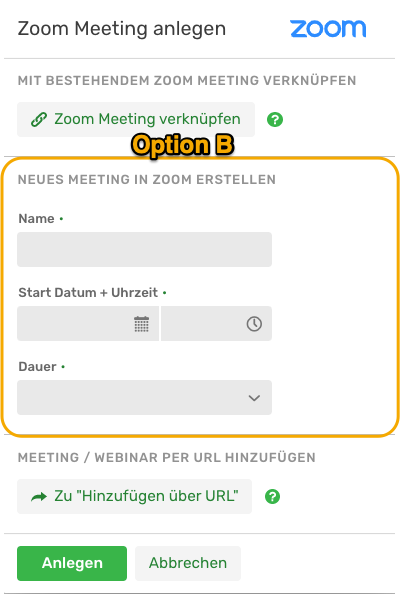
4.1.2 Then another window opens. Here you can create a zoom meeting using three different options.
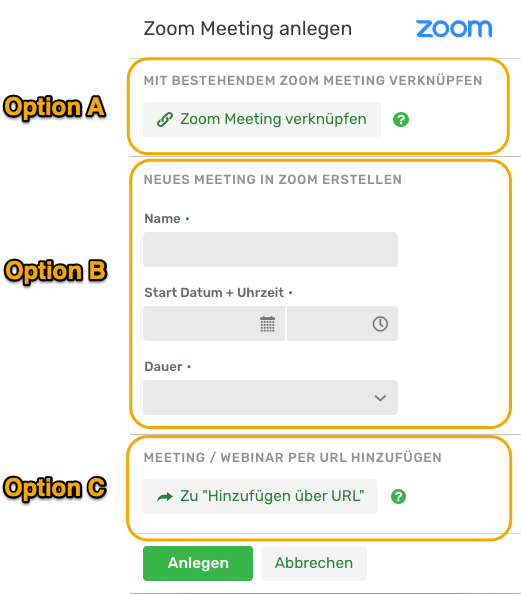
Option A: link an existing Zoom Meeting to the platform via Zoom ID (you need the corresponding Zoom ID for this)
Option B: create a new Zoom Meeting via Sweap.
Option C: link an existing Zoom Meeting /Zoom Webinar to the Platform via URL (you need the corresponding Zoom URL for this)
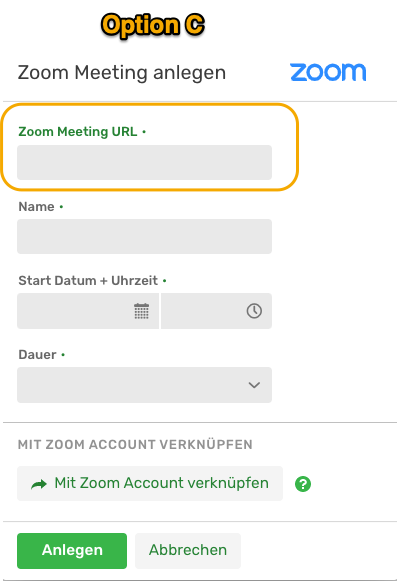
Further information on the Zoom URL can be found here.
4.2 The integration of parallel Zoom meetings
The Sweap Event Reception page offers you the possibility to integrate up to six different Zoom Meetings. These meetings can also be offered in parallel (start date and time are identical). However, since Zoom only allows one meeting per user at the same time, we would like to show you two different ways of integrating meetings that take place in parallel.
4.2.1 Variant A: The use of Zoom URLs
Simply insert the desired Zoom URLs. It is not necessary to take into account in which Zoom account the Zoom Meetings / Zoom Webinars were created beforehand.
4.2.2 Variant B: The use of a Zoom account with several users from the same organisation
For more information on linking Zoom user accounts to an organisation, click here.
Prerequisite: The desired meetings must be created in Zoom in advance (one user = one meeting).
- Link the Sweap account with Zoom user A.
- On the Event Reception page, user A connects the different pre-created meetings one after the other via "Link Zoom meeting".
4.2.3 Variant C: The use of different Zoom accounts for a Sweap event
If only one Sweap user is available:
- Link the Sweap account to Zoom Account A.
- Create or link Zoom Webinar A within the Event Reception page.
- Disconnect the Zoom Account A in the Sweap account.
- Link the Sweap account to Zoom Account B.
- Create or link Zoom Webinar B within the Event Reception page.
- These steps can be continued as many times as needed, depending on how many Zoom Accounts are available.
If multiple Sweap users are available:
- Sweap User A links to Zoom Account A in Sweap.
- Sweap User B links to Zoom Account B in Sweap.
- Sweap user A links his meeting on the Event Reception page and saves it.
- Sweap user B adds his other meeting on the same Event Reception page and saves it.
- These steps can be continued as often as required, depending on how many Zoom accounts and Sweap users are available.